Ads Launch Assistant, part of the Semrush Advertising Toolkit, helps you quickly build, manage, and launch ad campaigns across Google and Meta platforms.
With Ads Launch Assistant, you can:
- Reach customers through both Google and Meta from a single dashboard
- Launch effective campaigns faster with AI creatives and suggestions
- Automate repetitive steps, saving time and money
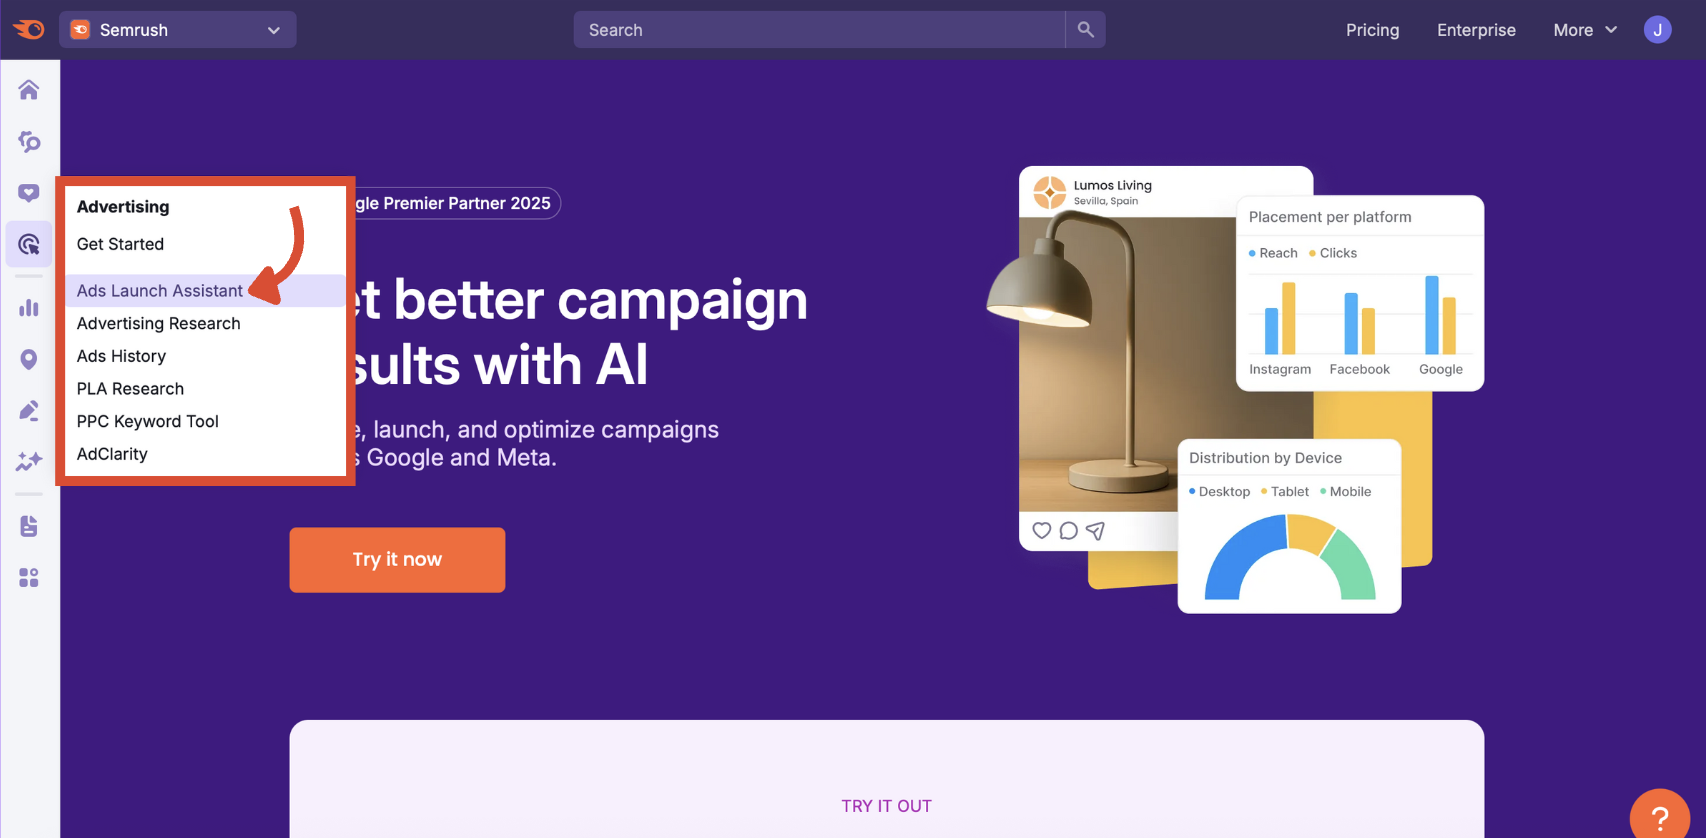
To open Ads Launch Assistant, go to the Semrush side menu, click the Advertising icon, and select Ads Launch Assistant.
Step 1: Choose Your Platform
Open the Folder selector in the upper-left corner to create or select a folder you would like your campaign to be associated with.

Once you click "Set up campaign" or “Try it now,” you will be prompted to connect your Google Ads and/or Meta Ads accounts.

From the platform selection screen, select Google Ads or Facebook & Instagram Ads.

First, we’ll go through setting up a Google Ads campaign to illustrate. However, you can choose to set up a Facebook and Instagram campaign.
Step 2: Set Google Ads Campaign Basics
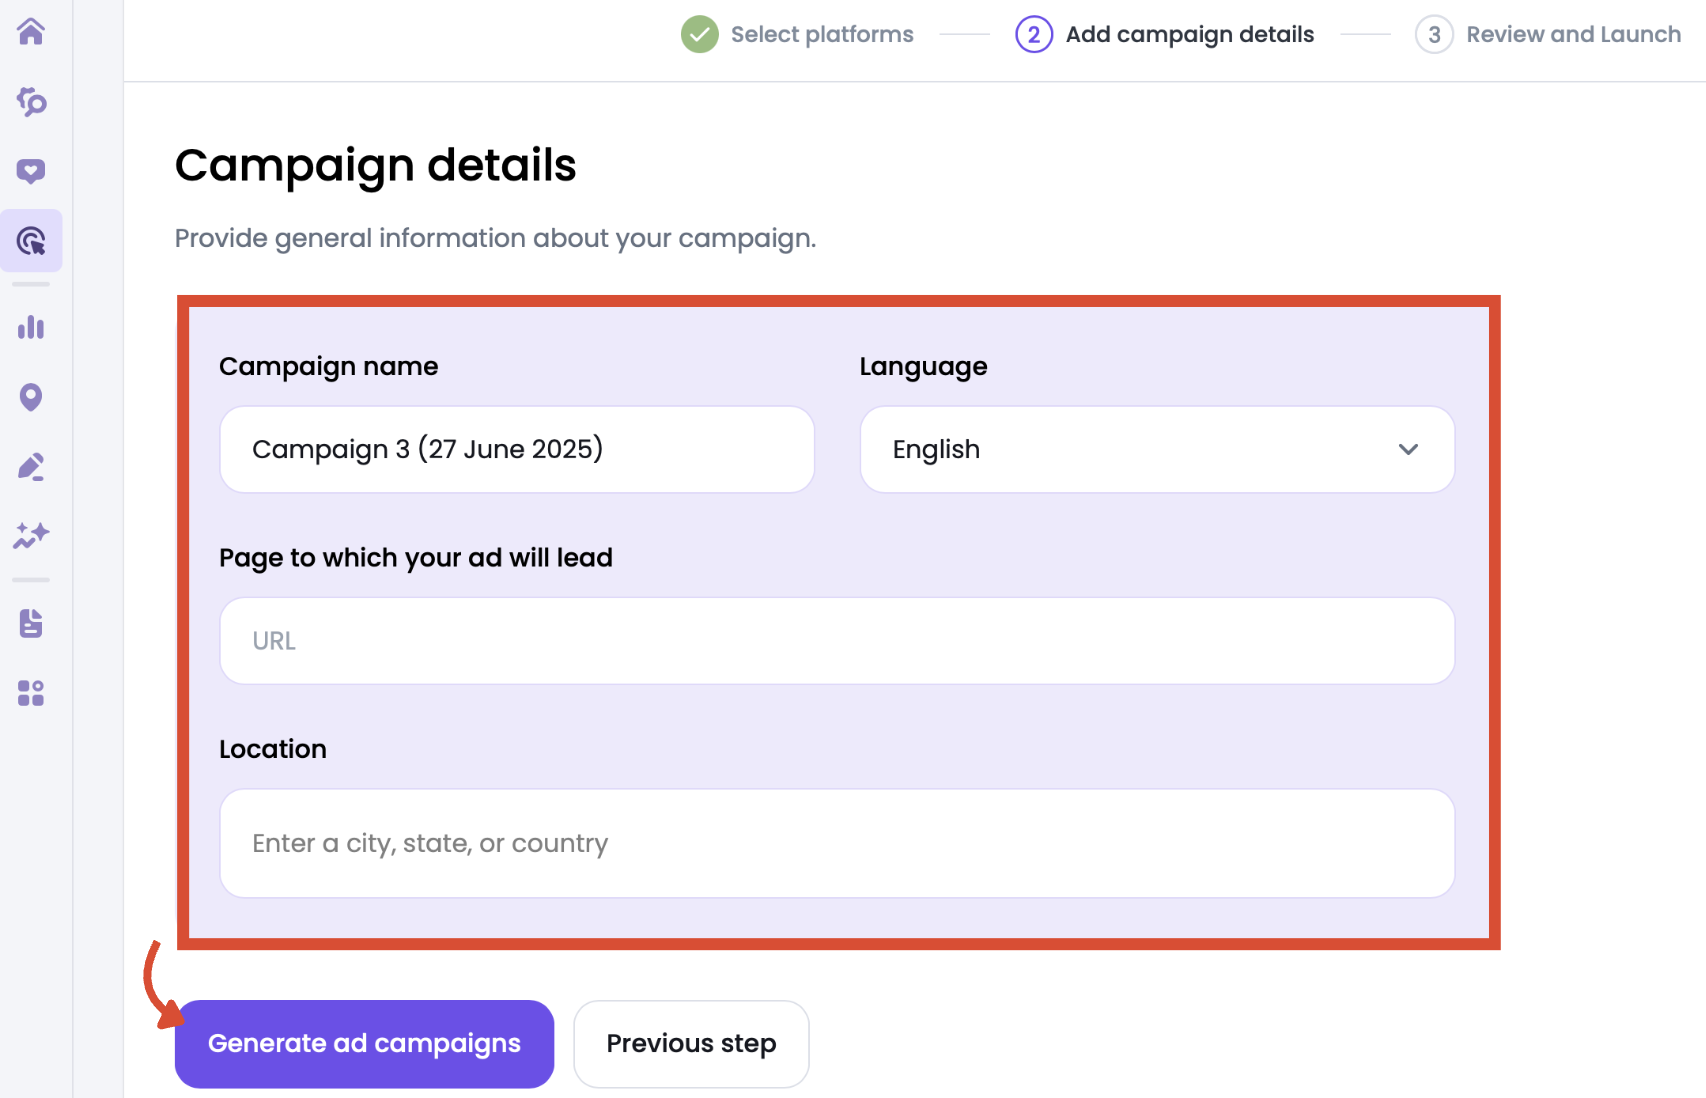
After selecting your platform, you’ll arrive at the Campaign details page.
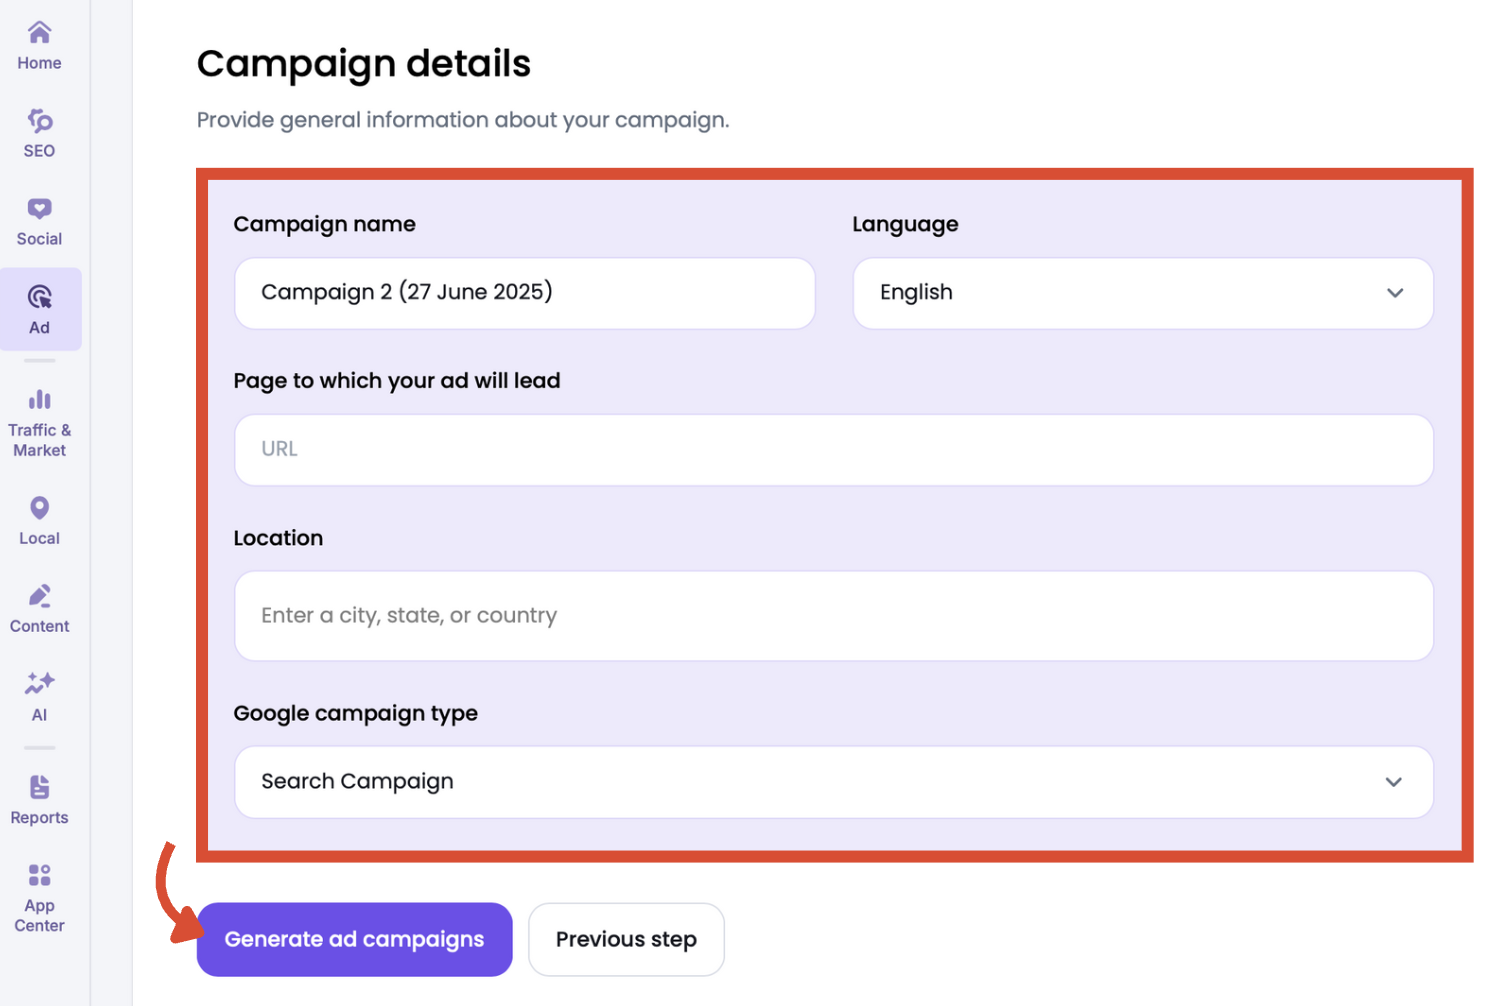
Here, you’ll enter the key information for your Google Ads campaign:
- Campaign name: Enter a descriptive name so you can easily identify the campaign later
- Language: Choose the language for your ads
- Page to which your ad will lead: Add the final URL where you want traffic to land. This is usually a product page or landing page.
- Location: Define the geographic targeting by entering a city, state, or country where you want your ads to appear
- Google campaign type: Select either a standard Search Campaign (more control) or a more guided Smart Campaign (minimal input required)
Once complete, click Generate ad campaigns to proceed. You can also return to the ad platform selection menu with the Previous step button.
Step 3: Review AI Suggestions and Launch
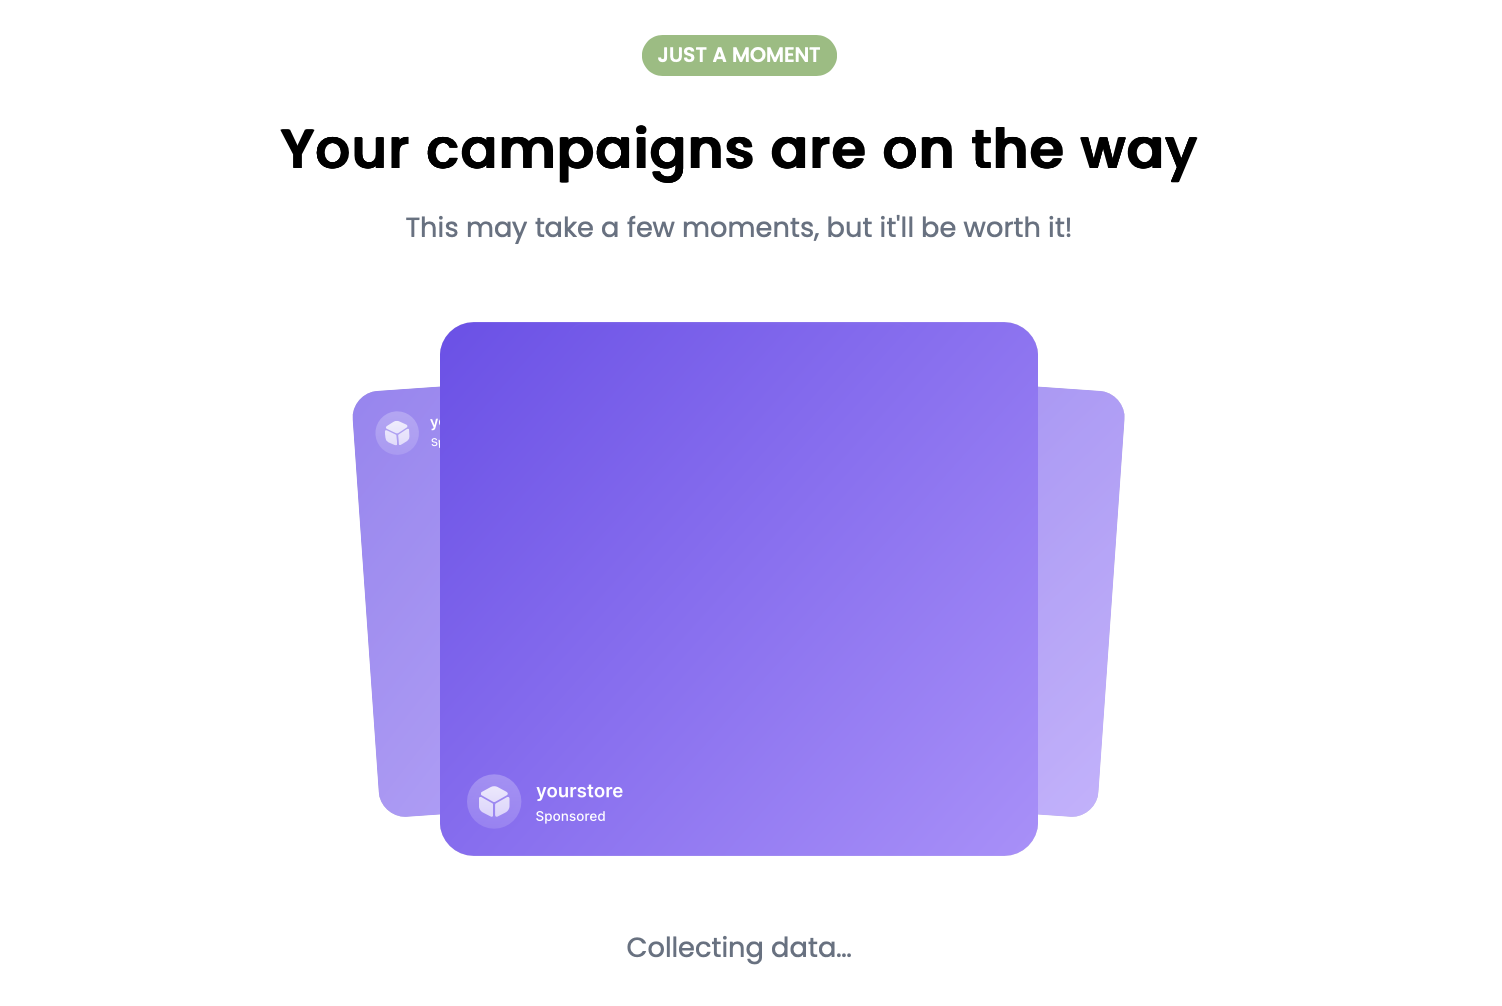
With the campaign basics established, Ads Launch Assistant gets to work generating ideas.
When it’s ready, review the prefilled suggestions carefully.

Ads Launch Assistant uses AI to:
- Suggest high-performing keywords (including negatives if relevant)
- Recommend sitelinks and callouts
- Generate ad copy with engaging headlines and descriptions
- Choose from a library of advertising templates (including videos and images) via an integration with Vista Creative, and can customize them (e.g. add music, change colors, background) to your business
If you want to adjust keywords, budget, or ad copy, you can edit them directly in this view before launch.
Confirm the final campaign settings, then click Launch campaign.
Step 4: Advanced Google Ads Options
After saving or launching your campaign, access advanced options via the edit icon in the campaign dashboard.
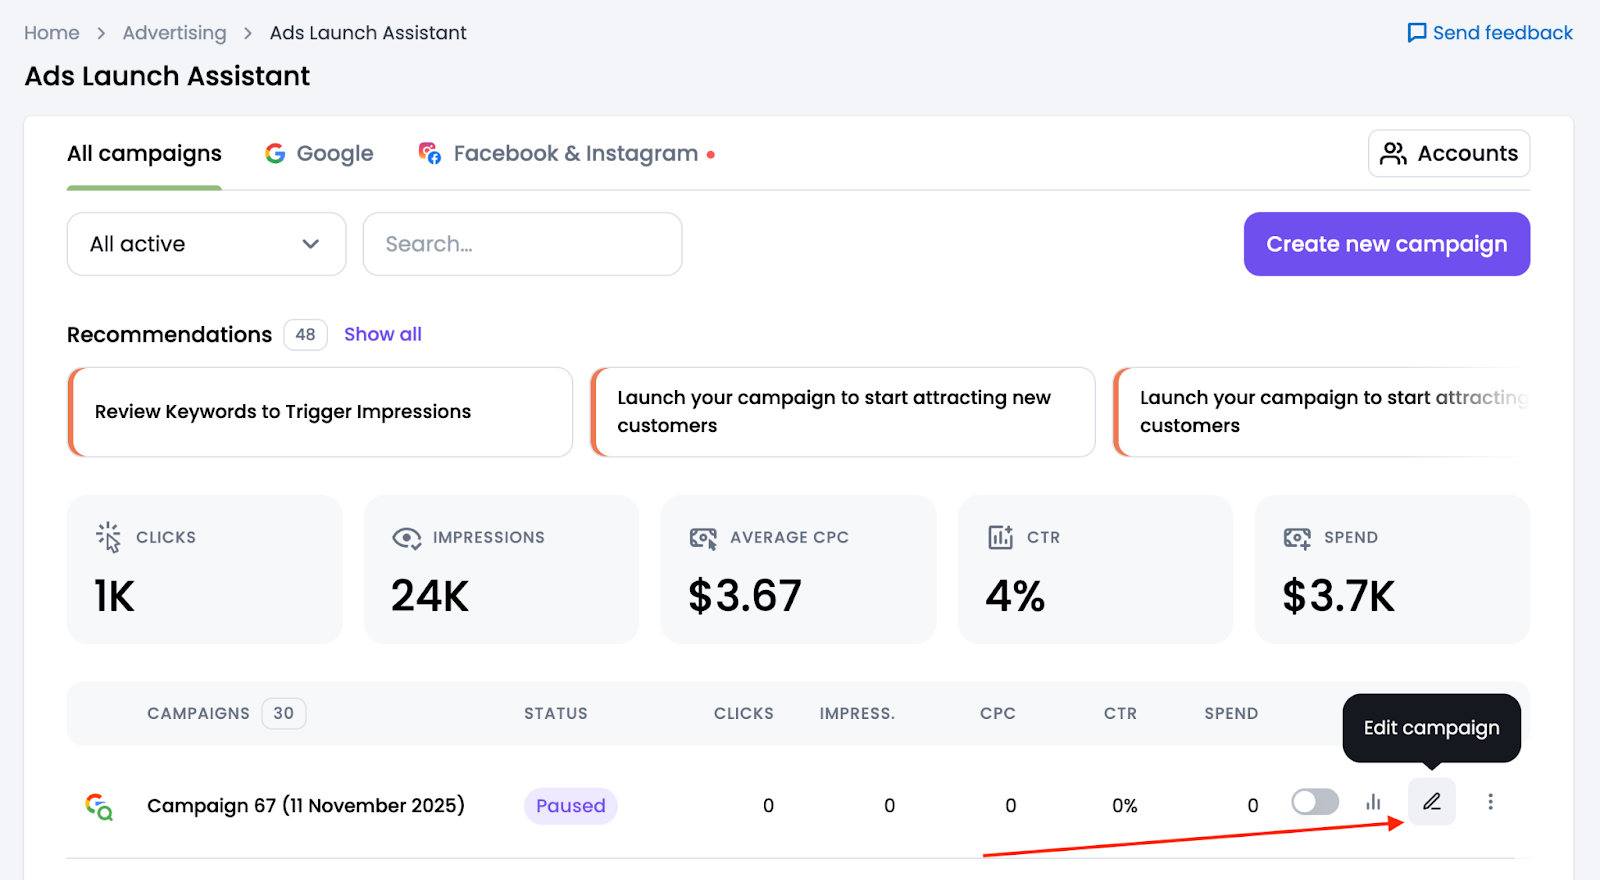
These options give you more flexibility to fine-tune elements beyond what AI has generated.
General Tab
First, review the General tab.
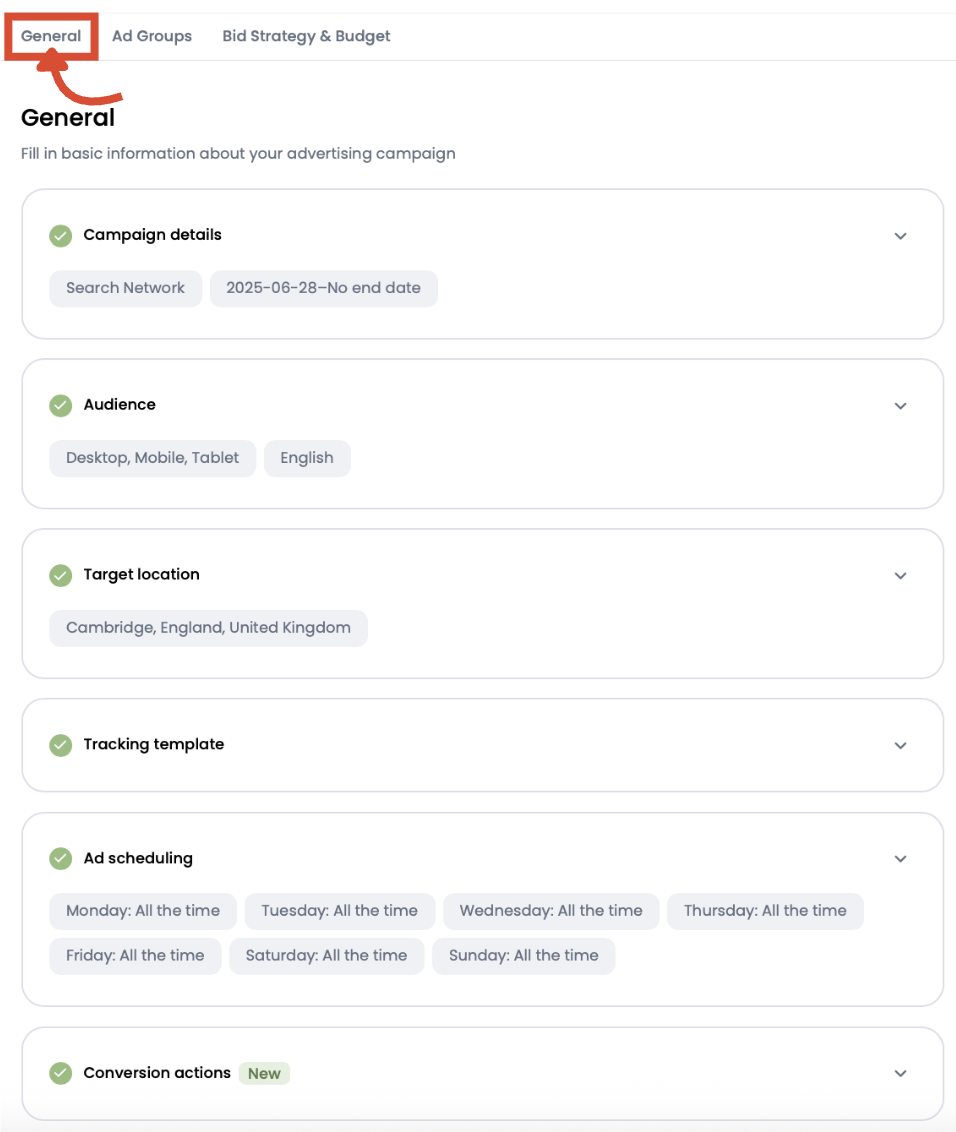
Here’s what you can edit:
- Campaign details: Confirm your campaign name, network settings (for example, Search Network, Google Search Partners, and the Google Display Network), the start date, and the end date (if you want one)
- Audience: Adjust the devices your campaign targets (desktop, mobile, tablet) and confirm the language settings
- Target location: Refine your geographical targeting with city, state, or country details
- Tracking template: Set up URL tracking parameters to measure campaign performance more precisely
- Ad scheduling: Choose days and times your ads should be active to align with your audience’s behavior
- Conversion actions: Define which conversion events you want to track, such as purchases, form submissions, or signups (must be set up with Google Tag Manager)
Next, move to the Ad Groups tab to organize and refine each ad group within your campaign.
Ad Groups Tab
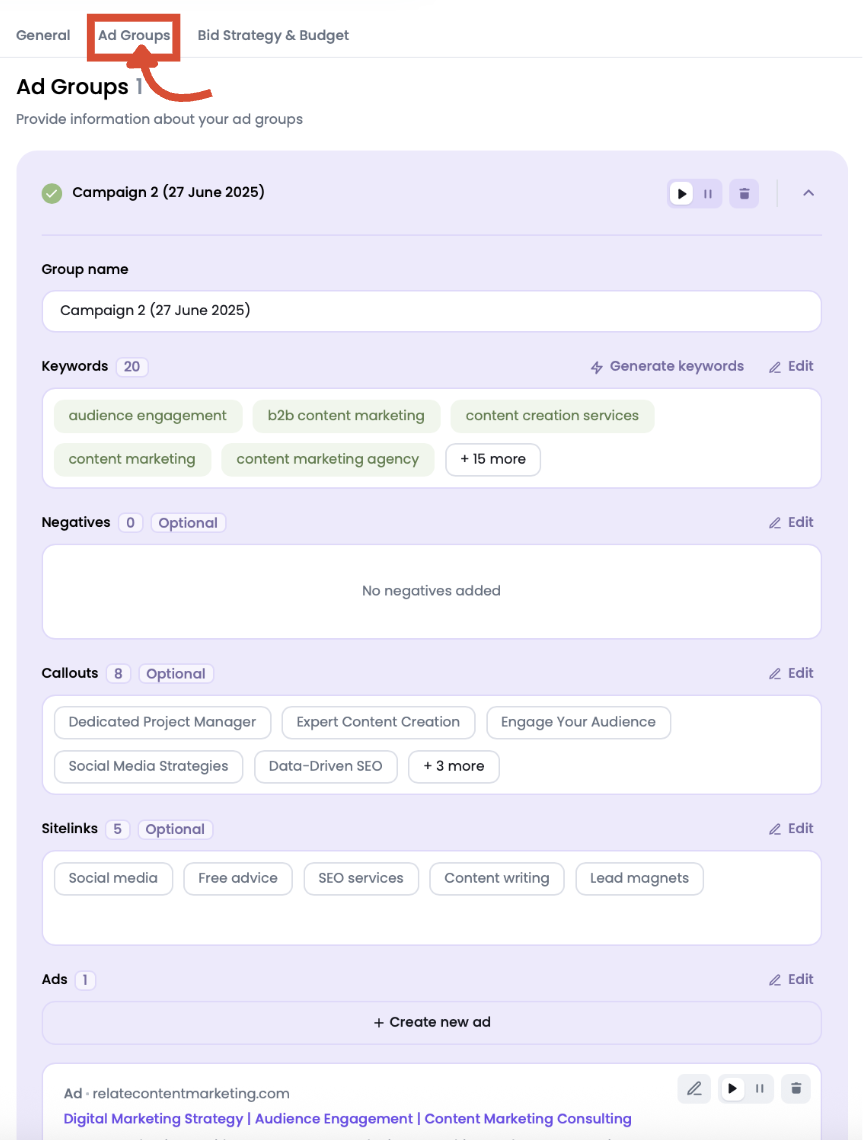
In this section, you can adjust:
- Group name: Label your ad group clearly so you can identify it later in reporting and optimization
- Keywords: View and manage the list of targeted keywords. Click generate keywords to let Ads Launch Assistant suggest more high-performing options based on your campaign details.
- Negatives: Define negative keywords to exclude irrelevant or low-converting searches. This is recommended to maintain relevance.
- Callouts: Add short, valuable phrases to highlight unique selling points of your business. Callouts do not include clickable links but enhance ad copy.
- Sitelinks: Add optional sitelinks, which direct users to specific landing pages beyond your primary URL, helping drive more targeted engagement
- Ads: Manage your creative elements in each ad group. Edit or create new ad variants to test headlines, descriptions, and CTAs.
- Generate a new ad group: Segregate your campaign into further ad groups for better targeting and relevance.
Bid Strategy & Budget Tab
Next, move to the Bid strategy & Budget tab to define how you’ll control costs and maximize performance.
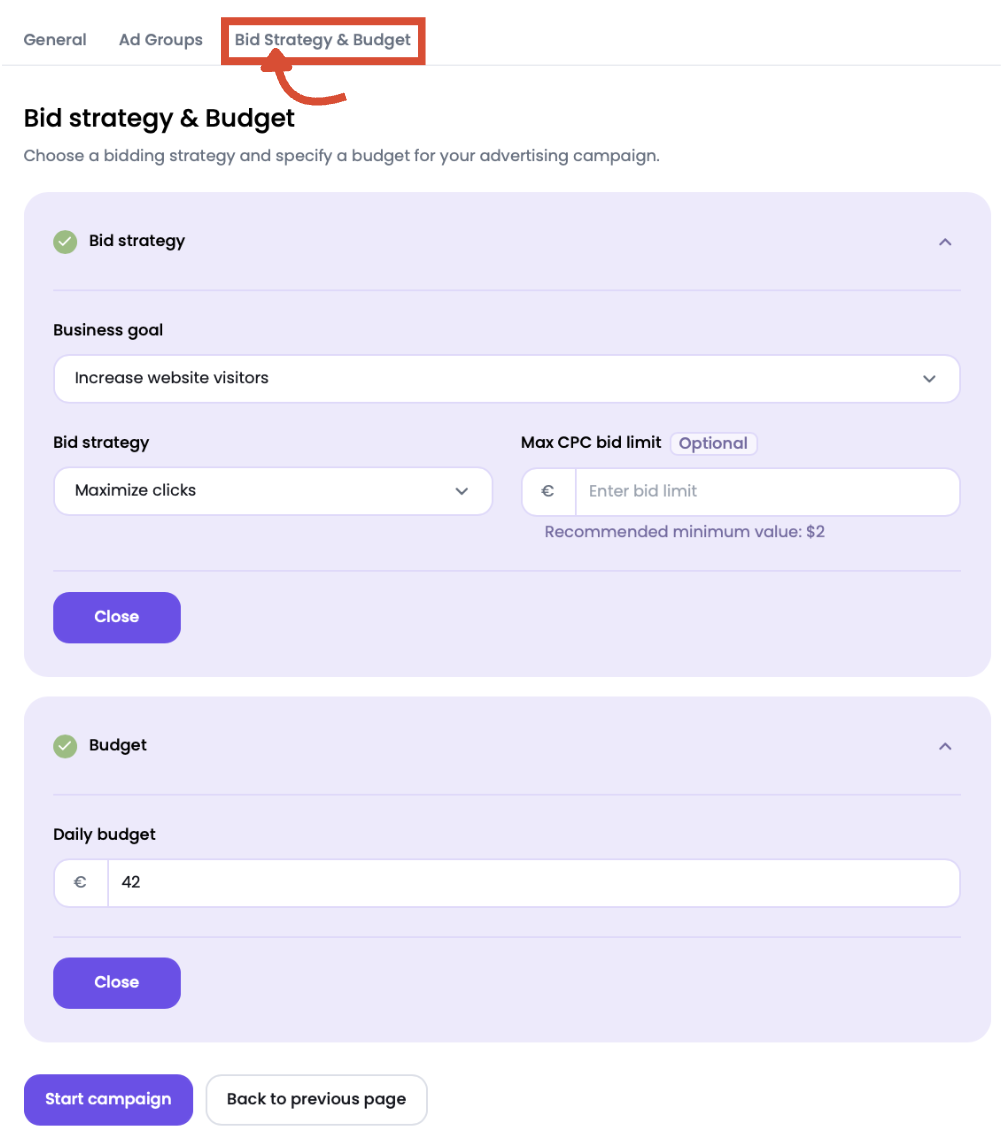
- Business goal: Select a business goal from the drop-down that best reflects what you want to achieve. For example, Increase website visitors.
- Bid strategy: Choose how you want to manage your bids. For example, Maximize clicks automatically adjusts bids to get the most clicks within your budget.
- Max CPC bid limit (optional): Set a ceiling on how much you’re willing to pay per click. This gives you an extra layer of cost control.
- Daily budget: Define how much you want to spend each day. This helps maintain spending discipline and forecast results.
After completing these fields, click Start campaign to launch.
Step 5: Set up Meta Ads Campaigns
If you have set up a Google Ads campaign in step 2, open the corresponding folder from the Folder selector. You will be directed to the campaign dashboard of that folder.

Then click the “Create New Campaign” button in the upper right corner of the campaigns dashboard. This will take you to the platform selection screen.
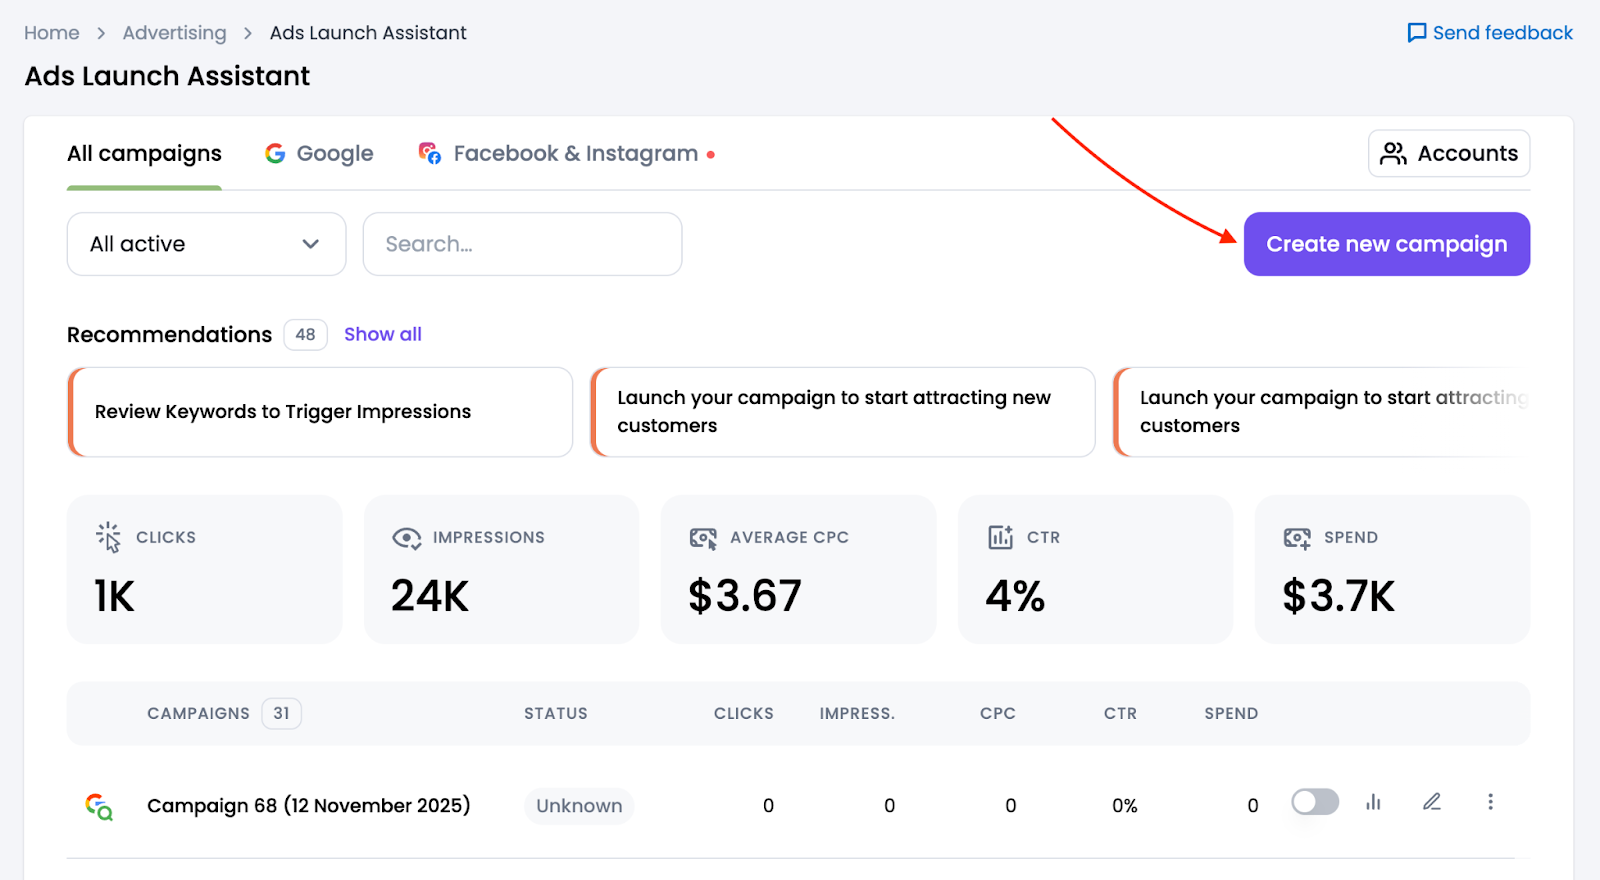
If your folder is still empty, click “Set Up Campaign” on the tool’s starting page. This will also take you to the platform selection screen.

On the next screen, provide the key details. This is much the same as the Google Ads campaign setup, except there’s no Google campaign type to choose.
Once you’ve entered everything, click Generate ad campaigns to proceed.
After the tool has finished configuring images, ad text, calls to action, and audience targeting, you’ll see the campaign summary screen.
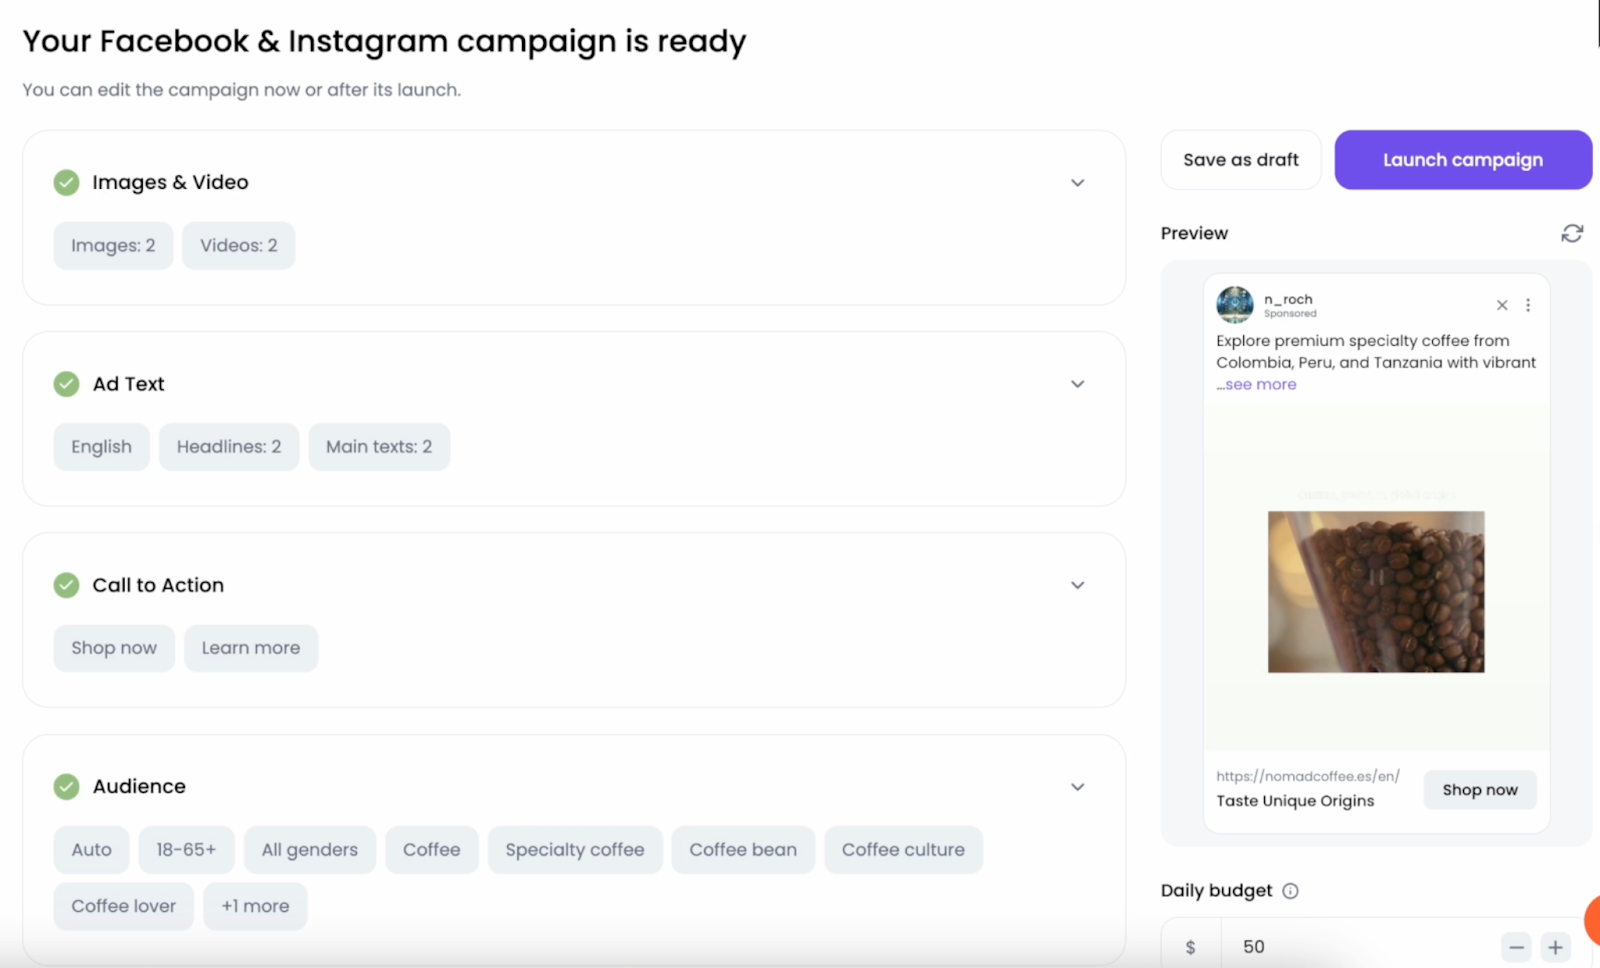
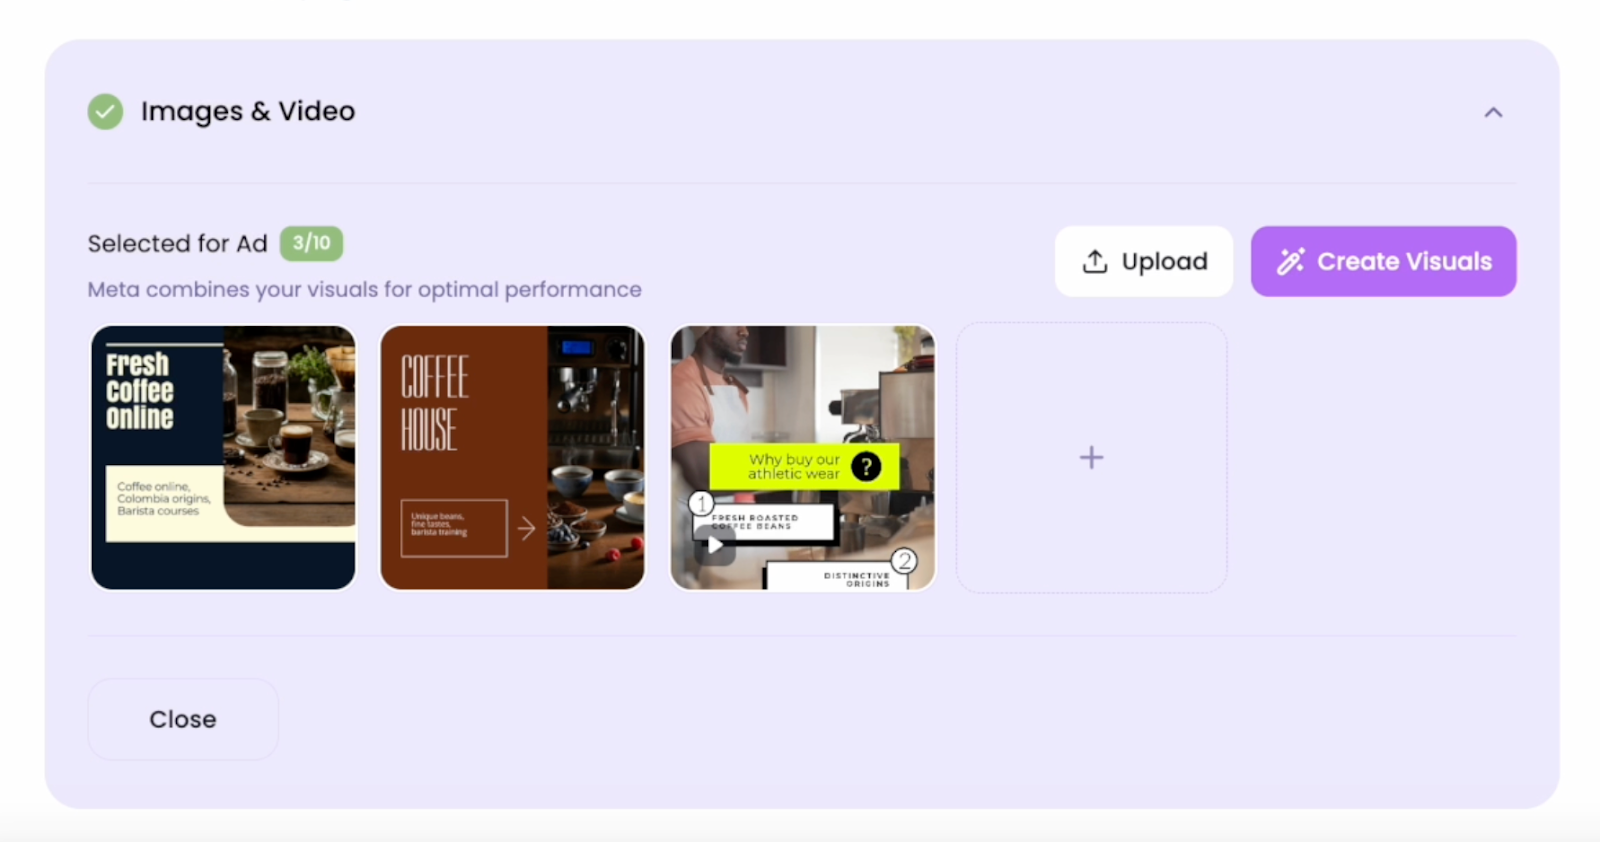
The “Images & Video” section will show the creatives AI has automatically generated for you based on your website URL. You'll see these pre-filled in the campaign summary screen.

You can add more visuals by clicking the "Create Visuals" button. This opens a modal where you can:
- Browse the Templates tab: Select from a library of professional video and image templates.
- Browse the Free Stock tab: Select from a free library of stock images and videos.
- Use the Upload tab: Upload your own media.
After selecting a visual from the “Templates” or “Free Stock” tabs, a media preview will appear. From here, you can click the "Generate for me" button, and AI will automatically customize that specific template based on your business URL.
Here you can:
- Check your creative elements:
- Chosen AI-generated or customized creatives
- Headlines and primary text
- Call-to-action buttons
- Audience segments
- Preview your ads in the right-hand panel to see exactly how they’ll appear on Facebook & Instagram
- Review all campaign details on the lower right, including campaign name, language, location, and website URL
- Check the approximate audience size based on your current setup
- Confirm your daily budget and start date
If you’re happy with the preview and settings, click the Launch campaign button in the top-right corner. You can also choose to Save as draft if you want to come back and refine the campaign before launching.
Step 6: Advanced Meta Ads Options
Once you’ve launched or saved a Meta campaign, you can refine and improve its performance at any time by clicking the edit icon in the campaign dashboard, the same as you would for Google Ads.
General Tab
The first tab shows general settings.

Here you can adjust your campaign fundamentals:
- Campaign details: Change the campaign name, target URL, campaign goal (like traffic or conversions), and campaign budget type (daily or lifetime)
- Budget and dates: Fine-tune the daily or lifetime budget, start and end dates, and see a spend estimate based on your configuration
- Meta Pixel: Enable or disable Meta Pixel tracking to measure conversions directly from your campaign view. This is key for tracking ROAS (return on ad spend) and remarketing.
Audience Tab
Switch to the Audience tab to edit targeting details.

You can:
- Toggle Advantage+ targeting, which automatically prioritizes high-performing audiences based on your settings
- Define audience age and gender
- Set audience interests, such as “digital marketing” or “content marketing”
- Adjust location targeting, down to city-level precision
Ads Tab
Finally, visit the Ads tab to manage the creatives driving your Meta campaign.
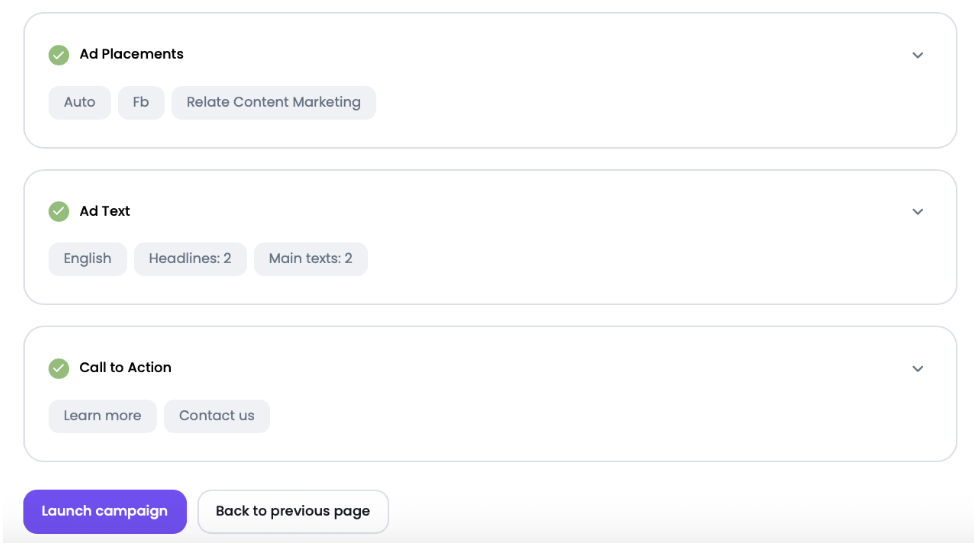
You can:
- Add new creatives by clicking the "Create Visuals" button. This allows you to:
- Browse and customize templates from the “Templates” tab (including using the "Generate for me" feature).
- Select free stock media from the “Free Stock” tab.
- Upload your own media from the “Uploads” tab.
- Remove images and video assets.
- Edit ad placement options (for example, automatic or manual placement on Facebook or Instagram)
- Change the headlines and primary text
- Adjust your call-to-action text
Ready to Monitor and Optimize?
Once you’ve launched your campaigns across Google and Meta with Ads Launch Assistant, the next step is learning how to track results.
After your campaigns have gathered data, the tool will also provide AI-powered recommendations to help you optimize performance. These include insights for keywords and ad copy, as well as Performance recommendations to prompt you to add conversion actions or install your Meta Pixel.
Head over to our Campaign Reporting manual to get to grips with performance metrics, conversions, AI recommendations, and data-driven adjustments.
Ads Launch Assistant is part of the broader Semrush Advertising Toolkit, giving you everything you need to plan, launch, and improve your paid advertising campaigns from a single workspace. Combined with your other Semrush tools for keyword research and competitor insights, you can maximize your ROAS while saving time and resources.